Welcome

As is the gardener, such is the garden!!
The trouble with gardening is that it does not remain an avocation, it becomes an obsession. - Phyllis McGinley

Showing posts with label Trimming. Show all posts

Friday, September 30, 2011

How to take care of the Fuchsias (Aljaba)

A gardening care guide for the fuchsia plant, known as a difficult flower to grow, is provided for you by gardening experts. The romantic, vibrant colored fuchsia plant has blossoms that dangle beautifully from flower pots, hanging baskets, or over the soil in a flower garden. If your not familiar with the fuchsia plant, let me teach you all you need to know about this beautiful plant. The fuchsia flower is a prolific bloomer all summer long and can be grown indoors with proper care. Learn how to grow and care for an interesting addition to your garden or home, the fuchsia plant.

The fuchsia plant is named after Leonhard Fuchs, a German doctor who lived in the early 1500's. Almost all the fuchsia varieties we know of today come from South and Central America, New Zealand, and Tahit.

Originally, nearly 100 varieties of fuchsia were known, but they have been hybridized so much that today there are countless varieties.

Fuchsias are low growing, bush or sometimes tree-like plants. We still cultivate many varieties as indoor plants, and one of them is so hardy that it can winter in the open in the south. Most of the cultivated Fuchsia varieties are hybrids which may be low, rather droopy flowering plants, semi-tall trees or shrub-like plants. People often prop them up to allow the beautiful flowers to hang freely from the leaf crown that radiates from a slender stem.

Fuchsia is rich in color. The eye catching colorfulness of the fuchsia flower is due to the fact that the sepals, leaf lobes and petals, are all richly colored. Fuchsias are the most beautiful when kept in rather cool conditions in half-shade. Too much warmth and sunshine leads to rapid flower loss and severe evaporation from leaves and stems. Always make sure that the fuchsia plant gets the water it needs in the growth period. All varieties of fuchsia require special care, but they will reward all your efforts by forming lovely new flower buds on the tips of their stems.


A gardening care guide for the fuchsia plant, known as a difficult flower to grow, is provided for you by gardening experts. The romantic, vibrant colored fuchsia plant has blossoms that dangle beautifully from flower pots, hanging baskets, or over the soil in a flower garden. If your not familiar with the fuchsia plant, let me teach you all you need to know about this beautiful plant. The fuchsia flower is a prolific bloomer all summer long and can be grown indoors with proper care. Learn how to grow and care for an interesting addition to your garden or home, the fuchsia plant.


Fuchsias are like children, though: each one requires a lifetime of care, or else…well, they won’t be much fun. Before I learned to take care of fuchsias, my well-intentioned gifts were crispy, drowned, or diseased by the Fourth of July. It turns out, though, that—unlike children—fuchsias are easy to care for, if you know a little bit about their needs.

Fuchsia is a genus comprising over 100 species of flowering shrubs and trees. The dangling habit and teardrop shape of the flowers gave rise to the popular name ladies’ eardrop. Most fuchsia are native to South America, where they grow in the understory of tropical or subtropical forests. There are a few interesting exceptions, however: Fuchsia excorticata is a tree from New Zealand that can reach 15 meters in height.
The plants you see at local flower shops are selected clones (cultivars), propagated by cuttings, not from seed. Over 10,000 cultivars have been described, and up to 2,000 are commonly grown. Nearly all of these cultivars, however, share the requirements of their South American ancestors: plenty of shade, frequent but not constant watering, and rich (read: fertilized) soil. To look their best, many fuchsia also need to be pruned at least yearly. If you can meet these needs, your fuchsia plant will remain lovely for many years.

Sun

Morning sun or sun-dappled shade is ideal for most fuchsia. Fuchsia can thrive in the sun, but the root system must be kept moist. Unless you are prepared for eternal vigilance, shelter your fuchsia from the hottest sun.
The flower symbolism associated with the fuchsia is confiding love. Fuchsia flowers are a very decorative pendulous "eardrop" shape, borne in profusion throughout the summer and autumn, and all year in tropical species. In many species, the sepals are bright red and the petals purple, a combination of colors that attract hummingbirds.

Water

Fuchsia should be watered in the morning, frequently enough to keep the soil moist but not soaked. In hot weather, you will need to water every day, while in cooler weather, twice a week will suffice. To decide whether to water your plant, look at and feel the soil. If the soil remains quite wet, right to the surface, then the plant doesn’t need more water. If the topmost layer has started to dry, then give water. Remember: fuchsia is more commonly killed by overwatering than by underwatering.

Fuchsia has a tendency to wilt on hot afternoons. It will perk up if misted with water or moved into the shade. You should avoid watering in the late afternoon or evening, however. Fuchsia has stomata (pores) in their leaves that close in the evening, preventing it from shedding excess water.

Fertilizer

Fuchsia is known as “gross feeders” and need access to plenty of fertilizer. When the plants are flowering, especially in late summer and fall, use water-soluble fertilizer formulated for tomatoes (higher in potash, or “K”). You can apply full-strength fertilizer every 1-2 weeks or quarter-strength fertilizer at every watering. I find the latter approach simpler.
If you plan to keep your fuchsia for years, you will need to overwinter the plant (see below) and then feed through the spring and summer. During the first month of spring, when the fuchsia starts to put out new growth, use high-nitrogen feed. Through late spring and summer, switch to a balanced feed (such as NPK 20-20-20). Then, as the plant starts to flower heavily, use tomato feed as suggested above.

Pruning

Fuchsia only develop flowers on new growth. This means that you need to encourage a nice distribution of new growth each year in order to have a concentrated show of flowers.
Fuchsia should be cut back by one-half to two-thirds in late autumn, as the temperatures cool and growth starts to slow down. Fuchsia in pots can be cut back to 4-8” above soil level. The remaining stems will form the skeleton of next year’s growth. Without this pruning, the plants become long-stemmed over time, with flowers only showing on the newer, outside growth.In the spring, as the fuchsia starts to grow vigorously again, begin applying high-nitrogen fertilizer as mentioned above. When the stems have at least three pairs of leaves, you can “stop” the plant to encourage a bushy shape with more branches and, as a result, more flowers. Simply remove the growing tip from stems after they have acquired several pairs of leaves. Do not remove the growing tip before this point, as new branches will only form at the junctions between leaves and stems. Be sure not to damage these critical areas (the leaf axils). You can stop the plant again after the new branches have several pairs of leaves.
Stopping can be difficult for the novice to stomach. The process may seem to threaten your plant. Remember this, however: the more stops you put in, the more flowers you will get out.

Overwintering
Even a single, light frost can kill some types of fuchsia. Therefore, the plants must be kept above freezing throughout the winter. If the temperature is likely to drop below 40-45 degrees Fahrenheit, then the plants will likely lose their leaves and go dormant. When the plants are defoliated, they can be lightly watered and placed under a table, covered in peat, or wrapped in bubble wrap or newspaper. Note that the fuchsia must not be allowed to dry out over the course of the winter. They will need to be checked and watered occasionally. If the plants dehydrate, they will die. In the spring, when all chance of frost has passed, the plants can be brought out of storage and into a shady spot, then watered. When new growth appears, begin applying fertilizer.

In warmer areas, or if you have access to a heated greenhouse that will keep the temperature above 45 degrees, fuchsia can be kept in green leaf throughout the winter. They will grow slowly throughout the winter, giving them an excellent start in the spring. Keep watering to a minimum so that the potting medium is just moist.
Fuchsia is easy to care for if you remember their sub-tropical origins. Keep them moist but not wet, give plenty of fertilizer, and prune in the autumn to encourage new growth next year.


Special Techniques of Bonsai (Part 2): Jin or Shari (Deadwood)


Jin and Shari or Deadwood as it is called in the western countries, adds not only an effective feature to a design but in the case of many old Pine and Juniper, a very realistic one as well. Jins on trees in nature are normally created when branches are broken by strong winds, by the weight of snow or by lightening strikes.
If you have branches that you are not going to require for your final styling you can use them to create jin. The use of jin on a bonsai implies to the viewer an increased age and shows the struggle of the tree to survive.
Shari is made to add age to a tree, or to disguise a bad scar or defect on the trunk. There must be a good reason to have shari. It should not be made just to have a shari. In nature shari are made by storms, rockslides and insect infestations, not to mention lightning and a dozen other things.
If two dead branches occur, one above the other, a shari can be made connecting them. This can have a very natural look and give age and beauty to an otherwise plain tree. Also, occasionally a tree has a large twisted branch with a jin at the tip; a small shari can be made further back on the branch to give it a more aged look.
Shari should be made in the direction of growth of the trunk or branch. Small shari can usually be done in one treatment. Larger shari should be done over a longer period of time because too much removal of bark and live tissue can seriously weaken or kill a tree. If a shari is made small at first, then enlarged, it will give the tree time to adjust to the change. When the wood that is exposed dries out completely it can then be widened. The process can progress over a few years if you desire the majority of the trunk to be deadwood. Man-made shari will look better if they do not go straight up and down the trunk. Natural shari can be in any shape but can be modified with care to effect improvement.
Unfortunately, its design can be difficult. A successful jin must look natural, it must look as though it has been created by nature in order to compliment and not detract from the tree. A common way of creating a jin is by carving using power and hand tool. It takes a great deal of skill, particularly if the wood is featureless. Deadwood features are created by tearing away at the wood to mimic the action of a broken branch pulling away strips of the grain to create a natural effect. These techniques can also be applied when creating jin from branches down to 1/2" in thickness; they are however intended only for species that have fibrous wood. This includes nearly all coniferous species but only some deciduous species.
The purpose of jinning a trunk is to create an effect of an old, dead stump that will compliment the main trunk of the bonsai. 

Jin can be made at any time of the year but if you are doing large branches it is best to wait until the tree is dormant and the sap is not flowing.

When creating dead wood on branches, select branches that are heavy enough to produce good jin. Remember that when the bark and soft tissue are removed what remains is much smaller than the branch you started with. If you want to jin a branch in the future that is not yet large enough, wire it, shape it, and let the wire cut in so that the twist effect will show when the bark is later removed.

When jin are made here and there on a tree it is best to make them small, unless a very large branch is jinned. If the tree is mostly jin, then mixed small and large jin looks good.
The first step is to remove the bark from the portion of wood that is to be jinned. Any remaining soft tissue is also removed. At this point only the part of the stump that is above the soil level will be worked on; further work will be carried out as the stump is revealed after repotting in the future.
The first slithers are pulled away from the stump; the top of the wood is either notched to segment it or crushed with pliers. Each segment is then pulled down and away from the stump with jin pliers or ordinary pliers. When pulling away strips of wood, it is important the live section at the sides or the base are not damaged. Strips rarely stop abruptly above the live wood and often need removing near the base with a knife or similar.
The pulling down of the segments of wood continues on the first half of the stump.
The second half of the stump is then pulled away; it is starting to reveal more of a natural shape. Unfortunately, the current shape resembles a catapult and it is decided to reduce the second half of the stump further.
After reducing the second half of the stump; now the jin is really starting to take shape. Increasingly smaller strips of the grain are now pulled the length of the stump, creating more texture to the wood.As the wood is fibrous, small burrs and pulls are evident. These are best dealt with by gently burning the surface of the wood.

The stump is gently scorched with a naked flame to burn off all the fibres. It is very important at this point to protect the rest of the tree, in particular the foliage, from not only the flame but also the heat that it generates. In this case, a piece of hardboard was used to completely cover the tree from the flame. It is also important that the jin itself is only slightly scorched to remove the fibres otherwise it is possible for the jin itself to set alight!Any blackening of the wood is easily removed by the process of smoothing off and lime-sulphuring. In this picture, the jin has been lightly carved with a small gouge to accentuate its lines and it has been gently sanded down with sandpaper to smooth out any tool marks. Sharp edges are also rounded off to replicate the effect that the action of the weather would have on deadwood in nature.


Once the jin is made, scrape it clean, sand it with emery cloth, (cloth backed sandpaper used by plumbers, available at most hardware stores) wire it and put movement in it if it has none. The jin can now be treated with lime sulfur.
to whiten it and to stop it from rotting in the future. In the future, black ink will be added to the lime sulphur when painting the recesses to add a greater illusion of depth. 
The following morning the lime-sulphur has nearly dried and the work is complete. Once treated, wait until the wood is dry (months later) and then treat with wood hardener.

After the jin is dry and shaped by wire it can be worked on again. Soak the jin with water and remove the softer wood in one direction with a wire brush. This gives the jin an aged look with the grain showing. Then treat it with lime sulfur and wood hardener if you hadn’t previously.
Lime Sulfur should be applied once per year to help preserve wood for the long term. If it appears too white tint the lime mix with sumii ink to the degree of grayness you desire. However, trees with naturally black dead wood, such as olive, should not be made white.
 The effect of the lime sulfur will decrease over the course of a few months so that the jin looks more natural
In the future, when the tree itself has been styled, the jin will be further refined to ensure it compliments other areas of deadwood on the bonsai as a whole. For the time being, it will now be left to dry and weather naturally.


Shari is made by cutting into the hard wood. Since it cannot be wired it should be carefully shaped with a small gouge. Do not use an electric tool except for rough cutting. The marks from electric tools do not look natural, so always finish with hand tools. Treat the shari with lime sulfur and a wood hardener after it has dried as you would with jin.
A nice effect can be achieved with old shari that have a significant rollover. Rollover occurs when the cambium grows rounded at the edge of a shari to heal it. Kill the live section back further to create a double rollover on the trunk.


Thanks to my friend Thanun Patipantada for the pictures.

Saturday, September 03, 2011

Morikami Japanese Garden, Boca Raton, FL. USA (Part 2)


Wednesday, May 25, 2011

Tips & Care: Pinching and Leaf Trimming (Defoliating) your Bonsai


What is the idea of trimming your bonsai?
Remember that during late spring and throughout the summer bonsai can quickly become overgrown, losing their shape and overall structure. The speed at which they grow depends on many factors, such as age, species and also the watering and feeding regime.To keep the growth balanced and in shape, trimming is necessary and essential for the development and maintenance of your tree, helping to create miniature trees, rather than overgrown bushes.
Trees should be allowed to have periods of free growth to keep them healthy. There is a close relationship between new shoots and new roots, so you can be sure that when a tree's shoots are extending, so are the roots. The extent of growth allowed will depend upon the stage of training. 

A tree in the development stage will benefit greatly from a period of free growth, which will help to thicken up the branches and trunk. For mature bonsai, growth should be kept more balanced and so shoots are scissor trimmed, pruning particularly vigorous shoots harder, before they begin to sap strength from other areas. The result will be shorter internodal lengths and more compact growth. However, if a branch is weak, allow it to grow to extend to provide it with extra strength the top of the tree (which is the most vigorous area in most species), with the lowest branches being weaker, (azaleas and kiyohime maples are notable exceptions to this growth pattern). 
This should always be taken into account when pruning or trimming trees, therefore it is usually necessary to prune harder higher up on the tree. If a bonsai is left to grow unchecked, the top will quickly become dominant, with the fine shoots near the apex becoming thick, ugly and out of scale.

1 Pcs. Bud Trimmer, Bonsai Pruner, Colors Will VaryPinching the candles on pine trees once they are fully extended will result in back budding and compact growth. It is worth taking out the dominant central shoot, to allow more strength to be channeled into the weaker side shoots. If the candles are allowed to develop into shoots, the size and strength of the tree will be increased. These shoots should then be cut to the required length in midsummer, or have the end buds removed to encourage denser growth the following year. 
Removing all the candles in spring as they start to extend will produce new buds both at the tip and further back. Some of these buds will open in the same year, producing compact growth with smaller needles. By using these techniques and also by controlling the watering and feeding while the needles are opening, their length can be considerably reduced. Do not, however, try for tiny spruce-like needles as these look unnatural and can make the tree weak once a twiggy structure has become established, summer pinching is a useful technique to maintain the tree's shape and to develop greater ramification. For juniper, cypress and other similar conifers, hold the foliage in one hand and 'pluck' the new growth. The shoots will be removed cleanly, whereas using scissors would cause more browning at the ends, especially in dry and sunny weather. 
With deciduous trees, such as maples, zelkovas, elms, beech and similar species, pinch out the growing tip once new shoots begin to unfurl and extend past the first set of leaves deciduous trees usually grow far more rapidly than conifers, with new shoots extending quickly do not prune just to maintain a silhouette. The interior of the tree will quickly begin to die if it does not receive adequate light and ventilation, so this should be considered. Lack of light and air flow can also encourage pests and diseases. Thin out dense areas of foliage to ensure that whole branches remain healthy. Leaf pruning deciduous trees can help considerably, preventing die-back when pruning, if possible, leave the bud at the end of the shoot pointing in the direction in which you require the growth to extend. This practice is known as 'directional pruning' and is a useful technique which reduces the need for wiring if removing large branches, always ensure that the remaining wound is concave, so that it will heal neatly and quickly. 
Seal with cut paste or similar (remember you can even use school glue). An ideal time to remove large branches is during midsummer, after the initial burst of spring energy has subsided. This ensures a smaller callous and less bleeding, although branches can usually be safely removed at most times of the year. For conifers, consider the option of creating a jin pruning deciduous trees in late winter or early spring enables their form to be seen clearly. However, make sure that you are aware of any branches that have died, so that you do not remove a live branch and find that you have unwittingly left a dead one! Trees that have been winter pruned will benefit by being given protection from the elementswhen removing branches, if unsure whether the branch should be removed completely, prune back hard first. Leave some buds that could grow back if desired, so that your options are left open'Finger pruning' is at the top of the list of skills needed.For Junipers and Cedars and other conifers, this involves pinching new growth off wherever shaping and eliminating is carried out.Simple in theory, just support the tree or branch with one hand and take the new growth between your thumb and forefinger in the other. Remove with a sharp twist, but avoid pulling on the branch or tree.It will take some practice to be comfortable with the technique. 
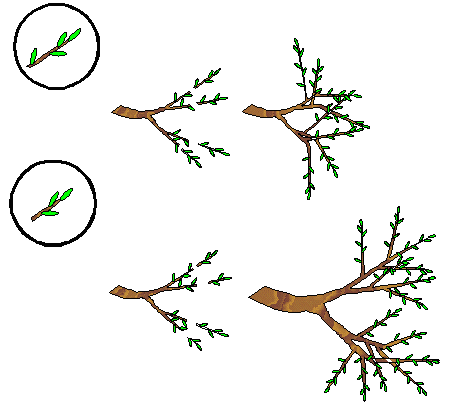
Rather than damage a valued bonsai, gain some familiarity first by performing it on a small bush.Once you can remove the growth cleanly without tugging on the plant, you're ready to use it on your bonsai. For deciduous trees, such as Maples,  Chinese Elm or others, scissor tip pruning is best. Trim the new shoots back to your imagined point based on the sketch.Leaf pruning or defoliation is also common for some deciduous trees and bushes, such as a ficus. 
Carried out in mid-summer, you simply remove half of the leaves with a pair of fine scissors. Leave the stems intact. For this, when you trim outward, you want to trim back the shoots but just after the next series of leaves. Finally, leaf pruning is used for both tropical and deciduous plants. This helps reduce the size of the leaves, get rid of unsightly leaves, and encourage growth by creating two growing seasons in one.